Uncategorised
- Details
- Written by Sonny Yu
1. Reset Yun to factory default by:
reset-to-factory-anyway
reboot
2. Setup static ip at wan:
nano /mnt/sda1/setwanstaticip.sh
#!/bin/ash
uci set network.wan.proto=static
uci set network.wan.ipaddr=192.168.241.1
uci set network.wan.netmask=255.255.255.0
uci commit network
/etc/init.d/network restart
chmod 755 /mnt/sda1/setwanstaticip.sh
/mnt/sda1/setwanstaticip.sh
Write comment (0 Comments)
- Details
- Written by Sonny Yu
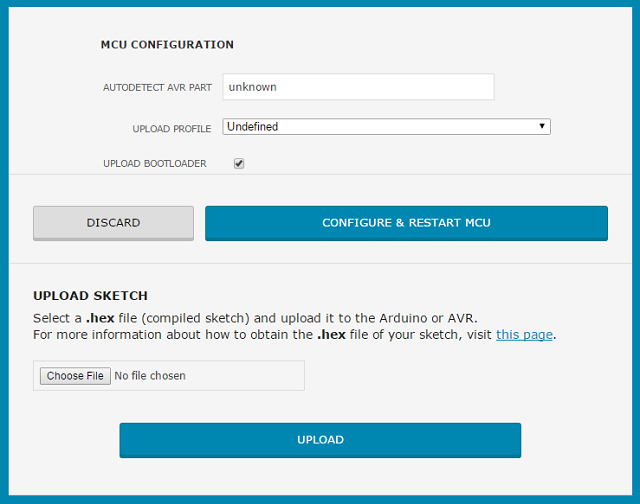
Autodetect AVR PART show unknow. Upload will be failed.
avrdude: AVR device not responding
avrdude: initialization failed, rc=-1
Double check connections and try again, or use -F to override
this check.
To confirm the problem by:
1/ Enable the NTB0104 level shift by set high to GPIO19: commands is as below:
echo 1 > /sys/class/gpio/gpio19/value
2/ Check if MOSI/MISO/SCK/RST hardware connection works as expect, below is the PIN mapping with the GPIOs. User can export the GPIOs in linux and run the commands as below to set high / low to GPIO. The related SPI pins will be high(+5V) / low accordingly and can be check by a multimeter. Low is 0v and high is 3.3v or 5v depends on the Arduino board.
Below is the commands need to type and check whether GPIO works.
echo 1 > /sys/class/gpio/gpio19/value   // enable level shift
echo 18 > /sys/class/gpio/export     //export gpio 18
echo "high" > /sys/class/gpio/gpio18/direction   // set direction to out and set level to high
echo "1" > /sys/class/gpio/gpio18/value   // set this GPIO to high, SPI_SCK should be high in the ICSP header.
echo "0" > /sys/class/gpio/gpio18/value   // set this GPIO to low, SPI_SCK should be low in the ICSP header.
echo 21 > /sys/class/gpio/export     //export gpio 21
echo "high" > /sys/class/gpio/gpio21/direction   // set direction to out and set level to high
echo "1" > /sys/class/gpio/gpio21/value   // set this GPIO to high, SPI_MOSI should be high in the ICSP header.
echo "0" > /sys/class/gpio/gpio21/value   // set this GPIO to low, SPI_MOSI should be low in the ICSP header.
echo 22 > /sys/class/gpio/export     //export gpio 22
echo "high" > /sys/class/gpio/gpio22/direction   // set direction to out and set level to high
echo "1" > /sys/class/gpio/gpio22/value   // set this GPIO to high, SPI_MISO should be high in the ICSP header.
echo "0" > /sys/class/gpio/gpio22/value   // set this GPIO to low, SPI_MISO should be low in the ICSP header.
echo 20 > /sys/class/gpio/export     //export gpio 20
echo "high" > /sys/class/gpio/gpio20/direction   // set direction to out and set level to high
echo "1" > /sys/class/gpio/gpio20/value   // set this GPIO to high, SPI_RST should be low in the ICSP header.
echo "0" > /sys/class/gpio/gpio20/value   // set this GPIO to low, SPI_RST should be high in the ICSP header.
Write comment (0 Comments)
- Details
- Written by Sonny Yu
Get hex file from arduino sketch
Make sure the Yún shield and your computer are on the same network, and open a browser. Connect to the Yún shield's web panel page by entering the IP address. Once logged in (default password:dragino),
User can check them in the Web GUI--> Sensor page. The Dragino Yun use avrdude to program AVR
Password: dragino (default)
The Dragino Yun GUI supports different kind of Arduino/AVR boards includes:
- Arduino Leonardo or Mega32u4
- Arduino Uno or Mega328p
- Arduino Mega2560 or Mega2560
- Details
- Written by Sonny Yu
With return character:
#include <Process.h>
void setup() {
 Bridge.begin();  // Initialize Bridge
}
void loop() {
 int temperature = random(0, 100);
 Process p;
 p.begin("/mnt/sda1/db.php");
 p.addParameter(String(temperature));
 while (p.running());
 while (p.available()) {
    char c = p.read();
    Serial.print(c);
 }
 delay(1000);
}
With return integer:
#include <Process.h>
void setup() {
 Bridge.begin();  // Initialize Bridge
}
void loop() {
 int temperature = random(0, 100);
 Process p;
 p.begin("/mnt/sda1/db.php");
 p.addParameter(String(temperature));
 while (p.running());
 while (p.available()) {
    int result = p.parseInt();          // look for an integer
    Serial.println(result);       // print the number as well
 }
 delay(1000);
}
Write comment (1 Comment)
Page 9 of 16
- You are here:
-
Home

- Uncategorised